cloud storage
Manage cloud backup services trends in SMBs
Talkin’Cloud reported on compelling new survey data that illustrates how comprehensive cloud backup solutions have become an essential piece of the services portfolio that MSPs offer to their SMB customers. The recent survey (of 434 U.S. based IT resellers and MSPs) reveals the impact of cloud backup offerings on their business. Key findings from the Survey: Managed Cloud Backup Services are:
- 51 percent of respondents pointed that “they could not effectively compete without cloud backup solutions as part of their portfolios.”
- 79% of the survey respondents predicted increasing demand for cloud backup solutions in the next 12 months.
- 75% of respondents find their managed cloud backup solutions as a gateway to up-selling more high-margin services
- Reliability and cost are top factors for consideration with reliability of service being a greater of the two.
The top concern for SMBs that are still waiting to adopt cloud backup solutions is the need to keep data on-site for security reasons. ElephantDrive is one of the most comprehensive cloud backup, sync, and sharing solutions providers and has addressed security concerns by enforcing on-site encryption (using 256-bit AES) of all data backed up to ElephantDrive. This means that you data never leaves your devices unencrypted. Additionally, the data is transferred over a secure SSL channel. For even greater security, ElephantDrive also offers the option to encrypt data using user provided keys. This ensures that only you (or whomever you share your password with) has the ability to decrypt your data. You can read more about all the security measures ElephantDrive takes to protect our customers data here.
ElephantDrive has been working with resellers and MSPs in the U.S. and internationally to enable them to resell the ElephantDrive cloud backup solution. To learn more about ElephantDrive’s robust reseller program, check out the ElephantDrive Reseller Program PDF here.
ElephantDrive on NAS: Restore After a Disaster!

Have you ever had a hardware failure or lost a storage device and all your important files are gone? It’s not surprising if you have – digital disasters are, unfortunately, common occurences. When bad things like this happen, you will be quite glad that you have backed up your devices, such as NAS, desktop computers, laptops, or phones to ElephantDrive because, while the physical device is no longer working or no longer available, you can still retrieve and restore your data at the ElephantDrive website. What a lifesaver, right?!
There are two methods to retrieve your files from ElephantDrive – Download and Restore:
-For a small number of files (aka mission essentials) that you need to quickly obtain, use the Download function to get few files/folders right away.
-For the full set of backups that you have synced to ElephantDrive from your devices, use the Restore function and expect it to take some time before your complete data set is recovered (duration varies among size of your data storage). Unlike Download, which is an ad hoc request, Restore is an automated job (similar to your Backup job) that will manage the process over time, even if you need to go offline before the transfer completes.
Download a file/folder:
#1: Log in to your account online: https://vault.elephantdrive.com/account/login.aspx
#2: Navigate to the file or folder that you would like to download
#3: Right-click on the file/folder and select “Download” (or highlight the folder and click on the “Download” button). You must have Java installed on your machine. Check for Java here: http://www.java.com/en/download/installed.jsp

#4: Select the location on your device where you would like to download the file/folder to. The download window will then show the progress of the download. You will need to keep this window open for the Download to finish. You are done once it’s finished the download process!

Restore a folder:
#1: Navigate to the folder that you would like to restore
#2: Right-click on the folder and select “Restore Folder” (or highlight the folder and click on the “Restore” button)

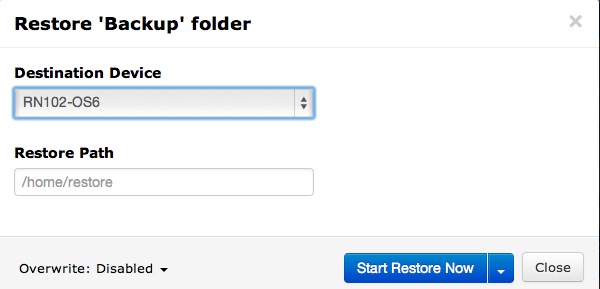
#3: Select a Destination Device and the Destination Path where you would like to restore the folder to. This device must be connected to your account (it can be a NAS device, PC, Windows Server, or Mac) and does not have to be the device where you originally backed up from. This can be set up and initiated offsite as well. Here, you can also enable “Overwrite: to replace any similar named files from the lower left corner.
#4: Click “Start Restore Now” or use the drop-down menu to select a different time to begin the restore.
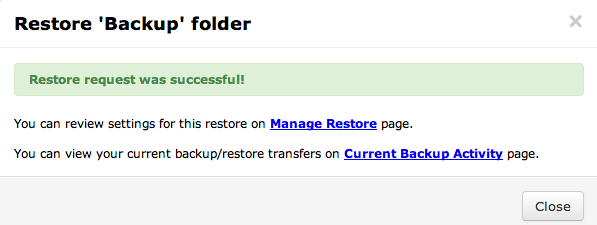
You will see a confirmation message once the restore is complete.
Don’t you love the easy steps to rescue your data? Make sure you back up your NAS and other devices to ElephantDrive.com!
—
ElephantDrive is proud to partner with these leading NAS manufacturers to ensure the best performance and user experience:

We are pre-installed as the “ReadyNAS Vault” on nearly all ReadyNAS storage products.

ED comes pre-installed on nearly all QNAP TurboNAS products.

ED is pre-installed on all Drobo 5N devices.

ED is pre-installed on the WesternDigital (WD) My Cloud EX4. More to come very soon!

ED is available on nearly all Thecus storage products.
![]()
ED will soon be available on nearly all Synology NAS devices. Stay tuned!
Questions? Feedback? Email us at support@ElephantDrive.com, we are always here to help!
ElephantDrive on NAS: Enable ElephantDrive on Your NAS Devices to Start Protecting your Data in the Cloud
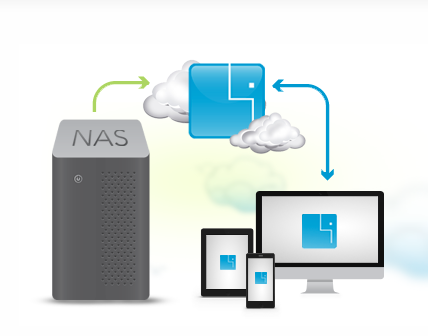
Now that you have decided on a NAS device that partners with ElephantDrive for your on-premise data storage, you are only a few steps away from achieving an even more robust data protection and access solution by backing up the files on your NAS device to the ElephantDrive secure cloud:
-You need to enable/turn-on ElephantDrive on your NAS device for it to sync data to our cloud.
-You need to authorize your ElephantDrive account on the NAS device (if you don’t already have an account, you can create one easily right from the NAS interface or at our web site).
The procedure of turning on ElephantDrive on your NAS device may be slightly different across NAS device models. In this post we are using the WD EX4 for the tutorial. If you need detailed instructions for a certain device, feel free to contact us at support@ElephantDrive.com or go to our help desk to search for your device: http://support.elephantdrive.com/categories/20072208-NAS-Support.
Here is a quick guide to connect your WD EX4 to ElephantDrive and start backing up your NAS device to the ElephantDrive cloud!
#1: Create an ElephantDrive account.
- Go to http://home.elephantdrive.com/welcome/nas/. For a limited time, we are giving away FREE 100GB for 3 months just to our NAS users. Click on Get 100GB For 3 Months button to get your FREE account. No credit card required!
- Step 1 – Enter your name and the email address you would like to use to manage your account.
- Step 2 – Create a password
- You have successfully created your ElephantDrive account!
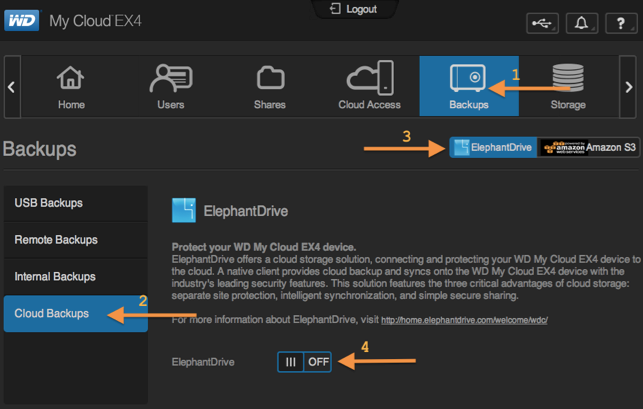
#2: Now that you have an ElephantDrive account, turn “ON” ElephantDrive in the WD My Cloud EX4 interface.
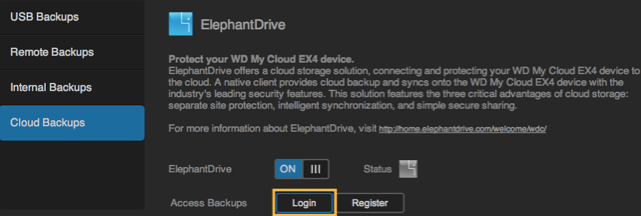
- ElephantDrive is located under Backups -> Cloud Backups -> ElephantDrive
- Click the OFF/ON button to turn ON ElephantDrive
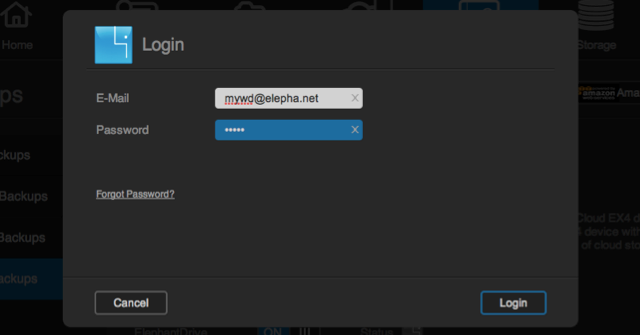
- Once you’ve turned ElephantDrive “ON”, you can login to your ElephantDrive account. Simply click Login
- Enter your ElephantDrive account credentials and click Login
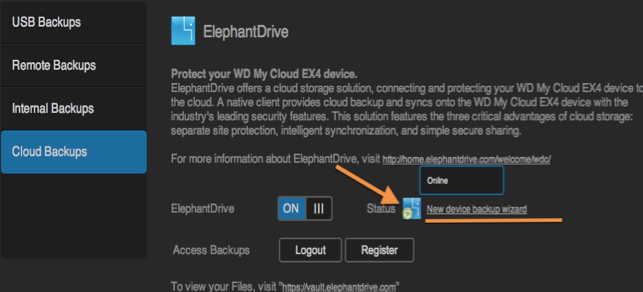
#3: Once you’ve successfully logged-in to your ElephantDrive account on the NAS, the Status icon will change from gray to blue. It will also display Online when you mouse over the blue icon.
You’re now ready to backup your data and shares to the ElephantDrive Cloud. Just click the New device backup wizard link to get started.
After clicking on the New device backup wizard, you may follow along with the Backup Wizard Tutorial here for additional assistance. Time to enjoy the peace of mind of having your data safe and secure!
ElephantDrive is proud to partner with these leading NAS manufacturers to ensure the best performance and user experience:

We are pre-installed as the “ReadyNAS Vault” on nearly all ReadyNAS storage products.

ED comes pre-installed on nearly all QNAP TurboNAS products.

ED is pre-installed on all Drobo 5N devices.

ED is pre-installed on the WesternDigital (WD) My Cloud EX4. More to come very soon!

ED is available on nearly all Thecus storage products.
![]()
ED will soon be available on nearly all Synology NAS devices. Stay tuned!
Questions? Feedback? Email us at support@ElephantDrive.com, we are always here to help!
ElephantDrive on NAS: 10 Reasons Why NAS + ElephantDrive Is The Best Solution For Your Data Storage
Small business data solution: NAS! Network-Attached Storage (NAS) acts essentially as a hard drive accessible via local network, allowing multiple computers on the same network to access and store/access data on a central device. Modern NAS devices are, easy to administrate and configure, making them ideal for small businesses and individuals. NAS is a popular method to keep important data protected and available on premise for end users with a significant amount of data. And now, ElephantDrive is pre-installed on many NAS devices to backup your data in the cloud so even if data on the NAS is lost or corrupted, you can still retrieve your important files from ElephantDrive cloud storage!
Here is a list of benefits that ElephantDrive offers on our partnered NAS devices:
#1 – ElephantDrive is pre-installed and natively integrated with each NAS platform for best performance and user experience; meaning you won’t need to manually install ElephantDrive on your NAS to backup the data in our cloud. ElephantDrive is integrated natively with each NAS’ user interface and behaves just like any other built-in feature on the NAS.
Read more: http://support.elephantdrive.com/categories/20072208-NAS-Support
#2 – Once you have the NAS device set up, you can backup data directly from the device to ElephantDrive without having to map NAS to a computer, making it a hassle free and ready for use when setup is complete!
#3 – Our service is account-centric as opposed to device-centric, meaning you can manage multiple NAS devices using a single account. Adding and managing additional devices is a piece of cake.
#4 – Wish you could go back in time and find an older version of a file? Now you can revert back to a previous version of any file with the Versioning control. All previous versions are easily identifiable with date and time. (stay tuned for more!)
#5 – Have you ever deleted a file by mistake only to realize later that you need it? Use Archive control to keep copies of deleted files and folders in ElephantDrive. Also use it to free up space on your NAS locally. (
#6 – You will be able to set up sub-accounts for multiple users under the main parent account. Sub-accounts use the parent account’s storage space, but allows data from different users to be stored in separate accounts. Sub-accounts also come with their own login credentials. This is ideal when you are sharing the account with colleagues or family.
Read more: http://support.elephantdrive.com/entries/58071-Can-I-set-up-multiple-users-for-one-account-
#7 – Have control over the resources that backup uses on your NAS. You will be able to adjust the bandwidth speed and CPU resources ED uses on your NAS. This allows you to allocate resources appropriately in your environment. Of course, changing these settings can be done in a snap (no rocket science involved)!
#8 – You also have control over how, when, and how frequently you want to backup your data on the NAS device to the ElephantDrive cloud. We offer the options of real-time backup and scheduled backup, whichever works the most conveniently and suits your backup needs will do!
Read more: http://support.elephantdrive.com/entries/28646606-How-do-I-create-a-backup-from-the-website-
#9 – Access your account anywhere! You will be able to access your backup in the ElephantDrive account anywhere (on a desktop, on your phone, and/or on the tablet) and anytime as long as you are connected to the Internet. ElephantDrive also offers mobile apps for both iOS and Android users to facilitate storing, organizing, and sharing data on the go!
Read more: http://support.elephantdrive.com/categories/20106946-Mobile
#10 – Users can easily share their data on the NAS devices that has been backed up to ElephantDrive via URL links using either our website application or mobile apps in a few simple clicks.
Read more: http://support.elephantdrive.com/entries/356436-How-to-Share-a-File-from-the-Website-Application
—
Now you are thinking “Where can I find a NAS device that comes with all the benefits above?” We have the answer for you.
ElephantDrive is proud to partner with these leading NAS manufacturers to ensure the best performance and user experience:
We are pre-installed as the “ReadyNAS Vault” on nearly all ReadyNAS storage products.

ED comes pre-installed on nearly all QNAP TurboNAS products.

ED is pre-installed on all Drobo 5N devices.

ED is pre-installed on the WesternDigital (WD) My Cloud EX4. More to come very soon!

ED is available on nearly all Thecus storage products.

ED will soon be available on nearly all Synology NAS devices. Stay tuned!
![]()
Questions? Feedback? Email us at support@ElephantDrive.com, we are always here to help!
ElephantDrive iOS App Demo #3 – View Files In Your Cloud Folder Offline, Without Internet Connection
Wi-Fi panic attack! No wireless connection but in immediate need to view a file? Good news! Whether you are on a flight or at a remote location where you have no 3G network, with a little advanced planning, you can still view files offline from your ElephantDrive Everywhere folder via our iOS app.
Now, let us get started – as long as you already have an ElephantDrive account (Need a free one? Sign up at http://home.elephantdrive.com/plans-and-pricing/free-plans/), we are only a few clicks away!
Step 1: Install the ElephantDrive iOS app on your iPhone/iPad. We can be found in your app store or at this link: https://itunes.apple.com/us/app/elephantdrive/id637645058
Step 2: Open your ElephantDrive iOS app. You will see your ElephantDrive Home Screen (as the image below on the left). Sign in, go to the Everywhere folder, click on the arrow on the right of the file that you’d like to access offline (as the image below on the right).
The arrow looks like this: ![]()

Step 3: Once you clicked into the arrow, you will see the Details View of the specific file that you want to view offline. Swipe to turn on “Available Offline” (as the image below on the left). You can view all the files that have been made to be Available Offline by clicking on the “Download” button and you will be able to see what files you have made available for offline viewing and access them from there when you are disconnected from network connections.
The Download button looks like this: ![]()
So now you are able to view these files offline anywhere! One thing to remember is that when the file is made Available Offline, it is downloaded onto the device where you set the file to be available for viewing offline. That means if you turned on the Available Offline feature on your iPhone and you want to also be able to view the same files offline on your iPad, you will have to turn the feature on for those files on your iPad as well.
Questions? Feedback? Comments? Feel free to contact us at support@ElephantDrive.com or find us on Facebook at www.facebook.com/ElephantDrive.cloud or follow us on Twitter at www.twitter.com/ElephantDrive! We look forward to hearing from you!
ElephantDrive iOS App Demo #2 – Edit Files On Your Mobile Phone and Sync Them Back to Your Folder in the Cloud
Edit on the go! Continuing our mini series of ElephantDrive iOS App Demos, this week we are showcasing the feature of our app that allows users to edit files on their iPhones/iPads and sync the edited files right back to their ElephantDrive folder in the cloud to store and share!
Now, let us get started – as long as you already have an ElephantDrive account (Need a free one? Sign up at http://home.elephantdrive.com/plans-and-pricing/free-plans/), we are only a few clicks away!
Step 1: Install the ElephantDrive iOS app on your iPhone/iPad. We can be found in your app store or at this link: https://itunes.apple.com/us/app/elephantdrive/id637645058
Step 2: Open your ElephantDrive iOS app. You will see your ElephantDrive Home Screen (as the image below on the left). Sign in, go to the Everywhere folder, and choose the file you want to edit.
You will need to have installed an applicable file editor app before you edit any files on your iPhone/iPad. You can find free or paid apps in your app store by keyword searches or under the Productivity category. Functions and features may vary across apps but should follow similar guidelines. In our tutorial, we are using the paid app “Numbers” for demonstration on an Excel file.

Step 3: After choosing the file you want to edit, the file will be showing in the display view (as the image below on the left). Click on the Share button on the top right corner of the screen. From there you will see a list of applications, click on Open in Numbers (or the editor app that you are using). The file will then open in an editor for you to make changes (as the image below on the right). Right now you can edit your file.
The Share button looks like this: 
Step 4: After editing your file, click on the Tools button on the top right corner of the screen (as the image above on the right). After getting into Tools (as the image below on the left), choose “Share and Print” à choose “Open in Another App” à choose a format in which you want to save your edited file in (in this case we chose Excel) à click on the Choose App button in blue (as the image below on the right).
The Tools button looks like this: 
Step 5: After clicking on the Choose App button in blue, select “Open in ElephantDrive” (as the image below on the left) and your edited file will be synced to the Everywhere folder on your ElephantDrive account. You will be able to view your stored files in this folder including the edited file that you just synced (in this case, the Expenses.xls file). You will also be able to find the edited file in your Everywhere folder using the ElephantDrive browser or desktop application.
The Choose App button looks like this: 
Editing and syncing on the go is just that easy with us! If you need further help in using your ElephantDrive iOS app or simply want to leave us feedback, feel free to contact us at support@ElephantDrive.com. We will try our best to assist you!
Like us on Facebook at www.facebook.com/ElephantDrive.cloud and follow us on Twitter at www.twitter.com/ElephantDrive for the latest ElephantDrive news and promotional offers!
ElephantDrive iOS App Demo #1 – Back Up Phone Contacts & Pictures
This just in! As a new version of our iOS app was made available in the iPhone/iPad app store recently, we are thrilled to present you with a mini series of ElephantDrive iOS App Demos to help you back up, store, and share your files easily and efficiently! We are proud to say that backing up contacts and pictures on your phone has never been made easier!
Now, let us get started – as long as you already have an ElephantDrive account (Need a free one? Sign up at http://home.elephantdrive.com/plans-and-pricing/free-plans/), we are only a few clicks away!
Step 1: Install the ElephantDrive iOS app on your iPhone/iPad. We can be found in your app store or at this link: https://itunes.apple.com/us/app/elephantdrive/id637645058
Step 2: Open your ElephantDrive iOS app. You will see your ElephantDrive Home Screen (as the image below on the left). Click on the Setting tab to make sure that you have Backup turned on for both Contacts and Pictures (as the image below on the right).
The Setting tab looks like this: ![]()

Step 3: Click on the Backup tab. You will see the options of Contacts and Pictures. The number of new files updated since your last back in your Contacts and Pictures will be displayed. Click on the item that you want to back up; be patient (wait time depends on your network connections and the size of your data); BOOM, it’s done! You can cancel the backup process anytime by clicking on Cancel.
The Backup tab looks like this: ![]()

Now you have your Contacts and Pictures on phone safely backed up to your ElephantDrive My Computers folder!
Extra: If you want to see what files from your phone Contacts and Pictures have been backed up to ElephantDrive, simply go to the Main tab, click on My Computers, and you will see a list of devices that you have backed up your data from. You can click on any of them to see the files associated with the device. In this case, the name of the mobile phone is “Bing”. Click on “Bing”, you will see the Contacts and Pictures folders. Click into the respective folders to see the contacts and photos that you have backed up via ElephantDrive. Again, you can also find them in your My Computers folder on our desktop drive or web browser at www.ElephantDrive.com.
The Main tab looks like this: ![]()

A browser view of your Contacts and Pictures backup folders:

At ElephantDrive, we care about what our users think. As we are constantly working to improve our products and their usability, if you have any feedback regarding improvements you’d like to see; new features that you wish we had; issues you encountered using our service, send your suggestions our way at support@ElephantDrive.com. We would like to hear from you!
p.s. We are currently in the process of developing the ElephantDrive App for Android. Stay tuned and LIKE us on Facebook at www.facebook.com/ElephantDrive.cloud for our latest news and promotional offers. We will keep you in the loop!
Frontline of Your Data Security – Building Strong Passwords

Password security check! As SplashData, a password management application company, recently released its finding of “The Most Common Passwords of 2013,” we are surprised to see that people have been and are still using the most vulnerable passwords that would give hackers and others easy access to the data, personal information, email, and even bank account balance. Building strong, yet memorable, passwords isn’t as difficult as you expect even though it may require a little effort and some knowledge in the logics behind password combinations. However, don’t panic. Here we will show you some rules of thumb to reinforce your password security, easily and effectively.
#1: Do not use public information, such as your full name, your kid’s birthday, date of your anniversary, etc. – These types of information are easy to access and commonly known by your acquaintances. If your intimate other can figure out your email password because it’s a combination of your name and his or her birthday, this is probably not the strongest password to use.
#2: Do not use consecutive or repeated numbers and/or letters such as 123456, 000000, abcdefg, abc123, aaabbbccc, etc. – We know this sounds like a no brainer, who uses passwords like these? Well, according to SplashData’s report, 11 out of 25 Most Common Passwords of 2013 fell in this category. Don’t fall for this trap.
#3: Do not use the same passwords for every single site. – When you use the same password for every site you have an account with, it means whenever someone figures out the password to one of your accounts, he has instant access to every other account that you’ve signed up with. As you don’t use the same key for your house and your storage locker, you probably don’t want to use the same “key” for your multiple online accounts.
#4: Do not write the complete passwords down. – What’s the point of having passwords if you are writing them down for others to see? If you absolutely have to write them down, write down hints instead of the actual passwords!
#5: Do not tell others your passwords. If in any case you need to share passwords with someone, use a password manager such as Dashlane, LastPass, SplashID, etc. so you don’t have to give out your actual passwords. Most of these applications also let you access passwords on both desktop and mobile though there may be a small fee that you need to pay for the service.
#1: Create a password of 8 characters or more. – Length of a password is one of the several important components of building strong passwords. Researches have shown that anything less than 8 characters is considered weak and not as secure as a longer password.
#2: Use a mix of different types of characters. – Complexity matters! Uppercase, lowercase, special characters, and numbers: Seems too complex? Then it’s the way to go! As many websites now actually require using certain combinations of character types, we suggest that people use this rule of thumb for sites that do not require complex character types as well for better password security.
#3: Build a password that you can actually remember. – As simple as it sounds, it’s probably the most difficult among the Do’s that we recommend here, as most of us can somehow relate to the experience of having to reset or retrieve a password because we cannot remember it. 3Hs8%@_djHG!28 may look like a strong password, but it will be an inefficient one if you can’t even remember it.
#4: Change your passwords periodically. – Some suggest changing your passwords every three months, but we think that may increase the chance of forgetting your passwords so we recommend twice a year, or at least once a year.
#5: Know where to recover your passwords when you need to. – Some websites send your password to your email address, some require you to answer a series of security questions before you can reset your password, and some send you a confirmation code via text message for retrieval. Regardless the method of recovering your passwords, make sure you have it set up completely while you sign up for an account with the website/application.
In conclusion, we believe data encryption is important to keep your files and documents secure, but before moving into that step, creating a strong password to protect your access to the data is equally essential and should not be overlooked.
Now that you have a strong password that you can remember to access your account, did we mention that you can utilize our Personal Key Encryption Setting to make the security of your data stored and backed up with ElephantDrive even more impeccable? Find out how to set up Personal Key Encryption in easy steps here: http://support.elephantdrive.com/entries/58086-What-is-a-Personal-Key-in-the-encryption-settings-
P.S. Keep it in mind that most companies, including ElephantDrive, will NEVER need or ask for your account password for any troubleshooting or information verification purposes. Be very cautious when someone reaches out to you for your password. Our advice is not to give out your password because this kind of scenario usually turns out to be a phishing scam.
For your reference, here’s a list of The Most Common Passwords of 2013. Don’t make the same mistakes.

Read on: http://newsfeed.time.com/2014/01/20/the-25-worst-passwords-of-2013/
Having Trouble Organizing Files On Your Computer? Master These Simple Tips To Effectively Organize Your Digital Data.
My New Year’s Resolution is… Be more organized! If this speaks your mind, we have got you covered. Some people are born with superb organizational skills and some people are just not. However, here’s the good news for those who are not as good in putting things in place: You can pick up a couple organizational tips to archive your digital files without rocket science involved.

Here are 6 tips on how to organize your computer files:
Tip #1: Delete old, unnecessary, and duplicate files.
As easy as it sounds, it may be a bit difficult for the hoarders who just cannot get rid of unnecessary items. The key here is to be ruthless. Any random files that you downloaded from the Internet: They can go; documents from your first job out of college that are in no way relevant to you now or later: They can go. A movie (that’s not your favorite) that your friend took 18 hours to send you via Instant Messenger before online streaming was available: This can go, too. Hit DELETE, and never look back. Trust us, it will make organizing easier not having these files on your computer.

Tip #2: Keep your desktop clean.
Have you seen a desktop buried by files and messy enough that you thought the hundreds of icons were actually part of the wallpaper? We have. Quite often. This is a bad habit. Whenever you create, receive, or download a file, do not leave it behind or just leave it on the desktop. Take immediate action to rename the file and categorize it into the relevant folder. Anything that’s not worth your 3-minute effort of immediate action, it may belong to the recycle bin.

Tip #3: Use folders, but don’t over do it.
Create folders to house your files. However, don’t create folders in layer after layer after layer. In most cases, one layer of hierarchy/category should be sufficient to cover most of your documents. Also, make sure to name your folders properly. A folder named “Untitled” or “Untitled 2” is just as ineffective as files floating around the desktop.

Tip #4: Name your folders using a systematic and consistent method.
Methods to name your folders can vary based on personal preferences. The main takeaway here is to be consistent. For example, whether you want to name your photo albums using date, location, occasion, or all of the above, keep it consistent for every photo album. If you name your music folders using artist, genre, or album title, make them consistent. The same goes for document folders that you name using function, class name, or company name. The clarity and consistency will help you when you need to sort through the files or use the Find function to locate a file later on.

Tip #5: Think of hierarchical structure when you organize, but use schemas that you are most intuitive and comfortable with.
“In psychology and cognitive science, a schema (plural schemata or schemas), describes an organized pattern of thought or behavior that organizes categories of information and the relationships among them.” http://en.wikipedia.org/wiki/Schema_(psychology)
We all have our own ways to categorize things. Think about your closet. Some people organize and categorize their clothes in various ways, such as by color, by season, by length of sleeves, or by type of garment. There’s no better or worse way of what schema you should use to categorize your clothes or files, as long as the hierarchical structure comes natural and makes sense to yourself. Put files that share the same similarity in hierarchy/category in the same place or in related folders. However, it does not mean that you should store all .docx or .pdf files in one place. Categorize files by other shared hierarchy that makes more sense in locating the files in the future.

Tip #6: Sync local folders that you need to access elsewhere to cloud storage.
After you have cleaned up your desktop and successfully put your files and folders in place on your computer, consider syncing the important folders to cloud storage, especially if you are constantly on the go. This will give you the flexibility to access and work on your files on different devices and computers, as well as share the files with other people.

If you think you’ve mastered the above tips, the next step to take is start organizing your files and putting them away! It’s time for your high-resolution wallpaper to show its face again. If you need help with setting up a cloud storage account or syncing your files, feel free to contact us at support@elephantdrive.com, we are more than happy to help, even when you are not an existing ElephantDrive customer!

